
| Well, the smog pump is an airpump, a supercharger is nothing but an airpump, so of course a smogpump can be adapted as one! My experiences with this cheap and plentiful smogpump is all good! But like everything else, the equation must sum up. Pumps have different sizes, and maybe not the size needed! The most trouble I have had with a smog pump supercharger was a wrong sized pump! Intended use is important too! I have used the smog pump as a supercharger on a racebike for short distance races. I have not used the pump as a part of a daily transport vehicle. Unlike the situation of a racebike, which is "supposed to be" taken apart and inspected, before next racemeeting, a daily driver would present other problems. Will the five roller- bearings inside the rotating drum be washed out, by the fuel- mix present? Remember that these pumped air so the permanently lubricated needle- bearings had a long life. Failure were common when downstream located diverter valves leaked, resulting in reverse flow of exhaust gasses, allowing carbon particles to enter the tight clearances of the pump. The most common, and cheapest, smog pump is the one mounted on GM and Ford V8 engined vehicles from 1969- onwards. Also known as an A.I.R. pump, this device can be found attached to the front of the engine, driven by a v- belt. These pumps gave a steady 5psi reading, when tested for functionality, and their mission was to ingest air, via small tubes to each exhaust manifold, just outside each exhaust port. This air- injection helped igniting the catalytic- converter, reducing emissions emitting the exhaust pipe. |
 |
 |
The smogpump supercharger I used for many years on my 50cc race- Honda: Modifications included closing the front intake and moving it to the rear- cover, making a keyway in the axle for belt- pulley, as well as boring the hole for the outlet. As it was driven of the ignition- side of the crank, rotation had to be reversed too. |
 |
 |
| Converting your smogpump into a supercharger goes like this: Unbolt the rear cover, and pry it apart, but very gently! These are delicate thin- wall castings and you dont want a leaking supercharger. A little trick here is to drift out the two dovels, which lines up everything. After loosening the cover, you have to wiggle it from side to side to extract the cover-mounted axle from the vanes rollerbearings. Once out, you can see the internals. Most significant is the large metal drum, with two vanes protruding 180degrees apart. You can also note the rollerbearing which supports the barrel. If You want to change the direction of rotation, you must pull the bearing support from the drum. A simple special tool must be made for this operation. The support is a casting, and a bit fragile! Once the bearing support is removed, you can see the two cages containing the seals. These cages are asymmetrical because one of the seals has a spring behind it. If you try to run the pump counter- clockwise as is, this spring will be compressed. Result will be a major leak, and at high rpm, the seals can move around and break! So it is vital that the cages are loosened, turned around, and welded back in! If the six? spotwelds are carefully removed, the cages can be loosened without getting out of shape. When re- installing the bearing support, take care not to squish the curved end- seals As an alternative you can run a jackshaft, allowing you to run the smogpump as is - see drawing! Most smogpumps has its air- intake in front, behind the plastic-fan, which also acts as an airfilter. This is no good since its quite impossible to fit a carb or much needed airfilter here. This intake can be closed by applying Devcon, or similar, into the hole. |
|
 |
 |
 |
The very precise layout of the functionality of the rotating drum: Within the rotating drum is the two vanes (blue colour), seals (red) and springs (green). This seal arrangement functions in clockwise- rotation only! If you intend to run the pump counter- clockwise, you must re-position the seal cages like these have been! These vanes are centered on the axlestud, fixed on the rearcover, via needle bearings. As the drum rotates on an off-center axis, the vanes, which are centered, will slide in and out of the drum. Whole idea is to run the vanes in a perfect circle - not touching housing or end cover walls. As the pumps working volume is outside the drum and inside the housing, seals are a nessecity. |
 |
I would like to emphasize how fine an instrument these OEM smogpumps are. Built as a sliding-vane supercharger of the finest quality, by controlling the movement of the vanes action inside the housing. Result is less heat, wear and friction. Do compare this pump to other sliding vane superchargers like e.g Judson, where vanes were scraping the walls, and to hinder friction, oil was induced at the inlet. |
 |
|
 |
|
 |
My Honda racebike in its initial layout - notice the many errors like too large an intake volume, which presented itself by un- responsive throttle! If racing a bike with throttle lag doesnt seem to frighten you, then imagine a backfire from this hi-volume intake - I shat my pants!!! |
| From "lessons learned" I reduced the intake volume severely! I have used this volume combination ever since! Shortly after I learned that the belt- tension setup also was out of place. |
 |
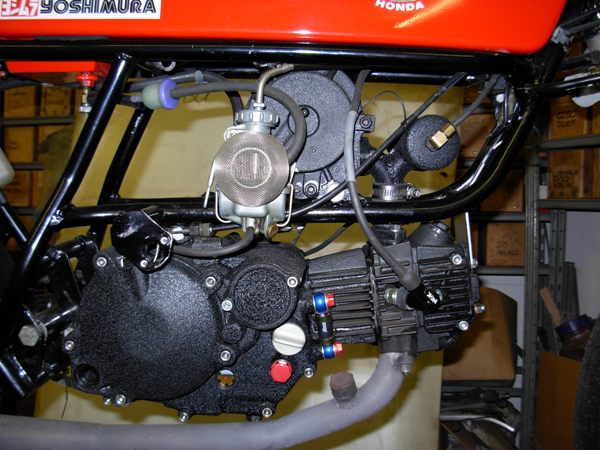 |
Keihin carburettor mounted directly onto smogpumps rear cover and boost- plenum reduced two- third in size. Most rewarding. |
 |
|
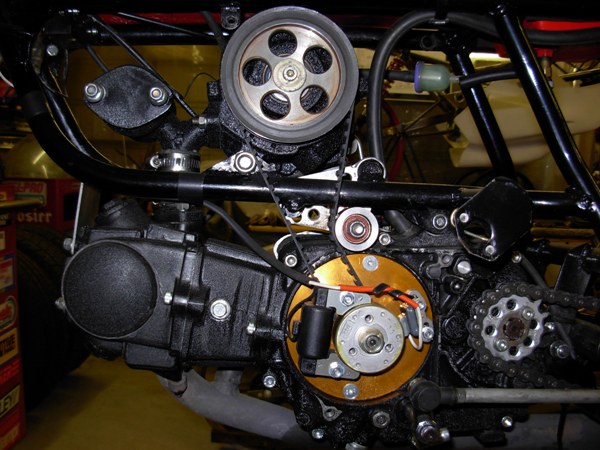
| A re-position of the pump itself can make them useable without having to reverse rotation. Jackshafts are not unusual and widely used especially on wide 4 and 6cylinder bikes |
 |
| Here followes a series of pictures how enthusiasts used the smogpump to supercharge their rides: |
|
 |
 |
 |
 |
 |
 |
 |
 |
 |
|